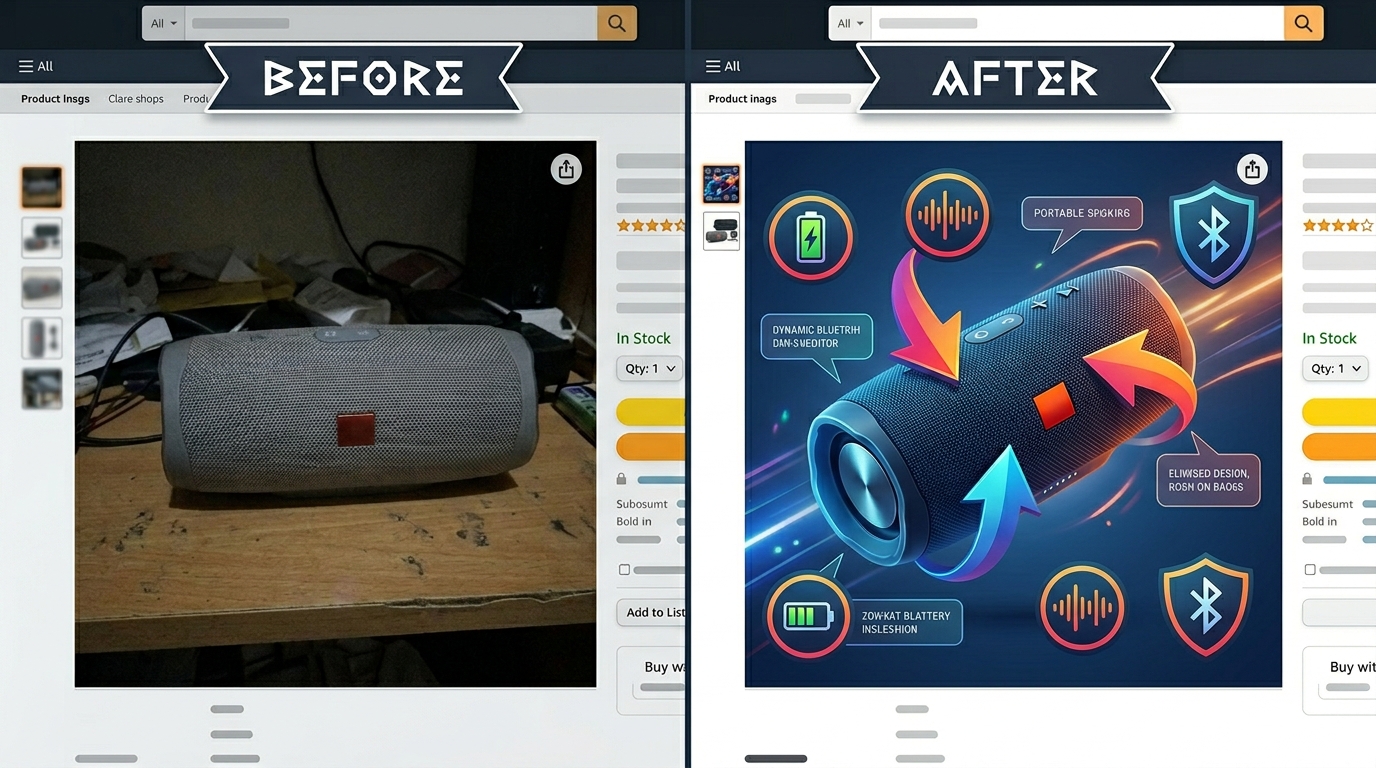
Your cosmetics listing is bleeding money. High ACoS, low conversion rates, and your BSR sliding backward every week. The problem isn’t your product – it’s your photos. Cosmetics product photography for Amazon requires precision that most sellers completely ignore. They slap together some iPhone shots with harsh shadows and wonder why their CVR hovers around 8% instead of the 15%+ that top performers achieve.
The A10 algorithm rewards listings that convert. Better photos drive higher CTR from search results and improved conversion rates on your product detail page. That combination pushes your organic ranking up and your ACoS down. For cosmetics specifically, buyers need to see texture, color accuracy, and application results. Miss any of these elements and you’re handing sales to competitors.
Essential Equipment and Setup for Cosmetics Photography
Lighting Equipment That Actually Works
Forget ring lights and basic LED panels. Cosmetics product photography for Amazon demands controlled lighting that eliminates harsh shadows and reveals true product colors. You need a minimum 3-light setup: two key lights positioned at 45-degree angles and one fill light to soften shadows.
Use continuous LED lights rated at 5000-5500K color temperature. This daylight-balanced lighting prevents the yellow cast that destroys color accuracy in makeup photos. Position lights 18-24 inches from your product to avoid hot spots that blow out highlights on glossy packaging.
Amazon Main Image Best Practices 2 covers this in more detail.
Add light diffusion through softboxes or umbrellas. Direct lighting creates specular highlights that hide product details. Diffused light wraps around curved surfaces like lipstick tubes and compact cases, revealing shape and texture without glare.
Camera and Lens Selection for Detail Capture
DSLR or mirrorless cameras outperform phones for cosmetics photography. You need manual control over aperture, shutter speed, and ISO to maintain consistency across your image set. Shoot at f/8 to f/11 for optimal sharpness across the entire product.
Use a 50mm or 85mm lens for minimal distortion. Wide-angle lenses make products appear smaller and distort proportions. Macro lenses work for extreme close-ups but aren’t necessary for standard Amazon listing images.
Shoot tethered to a laptop when possible. This allows real-time review of focus, exposure, and composition. Catching problems during the shoot saves hours in post-production.
Backdrop and Surface Considerations
Pure white backgrounds meet Amazon’s main image requirements, but your lifestyle and feature images need variety. Use seamless paper or vinyl backgrounds that curve from vertical to horizontal without a visible seam.
For reflective surfaces like mirrors and glass, add texture through acrylic or frosted glass. This prevents the background from appearing in reflections while maintaining the clean look Amazon’s algorithm favors.
Control reflections on metallic packaging with fill cards – white foam core positioned opposite your main light source. This technique eliminates dark reflections that make products appear dented or damaged.
Lighting Techniques for Different Cosmetics Products
Powder and Compact Photography
Powder compacts require careful lighting to show both the outer packaging and the actual product inside. Use a slightly improved camera angle – approximately 15 degrees above the product – to capture the compact’s depth without creating shadows inside the pan.
Position your main light source at a 30-degree angle from the camera axis. This creates subtle shadows that define the product’s edges while preventing light from bouncing harshly off the mirror inside the compact. Add a second light from the opposite side at lower intensity to fill shadows without eliminating them completely.
For powder texture shots, use a single directional light at a low angle. This raking light reveals the powder’s surface texture and shows whether it’s pressed, loose, or has a specific finish like shimmer or matte.
Liquid and Cream Product Lighting
Liquid foundations, serums, and creams present unique challenges due to their transparent or translucent containers. The goal is showing the product’s color and consistency without creating distracting reflections or hot spots.
Use backlighting for transparent bottles to show liquid levels and color saturation. Position a diffused light behind the product and slightly to one side. This technique makes the liquid glow while maintaining detail in the packaging and labeling.
For cream products in jars, remove the lid and position it beside the jar to show both the packaging and the actual product. Use soft, even lighting from above to prevent shadows inside the jar while showing the cream’s texture and color.
Lipstick and Tube Product Strategies
Lipstick photography requires showing the product color accurately while maintaining detail in often-reflective metal tubes. Extend the lipstick approximately halfway to show the bullet shape and color while keeping enough retracted to prevent breakage during the shoot.
Use polarizing filters on your lens to control reflections on metallic tubes. Rotate the filter while viewing through the camera to find the position that eliminates unwanted glare while maintaining the tube’s metallic appearance.
Create color swatches by applying the lipstick to a clean white card positioned beside the tube. This shows buyers the true color payoff and opacity, addressing the most common complaint in cosmetics reviews: “color doesn’t match the photos.”
Staging and Composition for Maximum Conversion
Product Arrangement and Hierarchy
Amazon shoppers scan images quickly. Your composition must guide their eye to the most important information within 3 seconds. Place the primary product in the upper third of the frame using the rule of thirds. This positioning feels natural and draws immediate attention.
For product bundles or sets, arrange items by size with the largest piece as the anchor. Smaller items should support and complement without competing for attention. Use odd numbers of products when possible – groups of 3 or 5 create more dynamic, visually interesting arrangements.
Maintain consistent spacing between products. Cramped arrangements make individual items harder to identify, while excessive spacing wastes valuable image real estate. Aim for approximately 10-15% of the product width as spacing between items.
Color Coordination and Brand Consistency
Your image set should reinforce your brand’s color palette across all seven slots. This doesn’t mean every image uses the same background, but colors should complement rather than clash with your packaging.
Use color psychology strategically. Cool blues and greens suggest cleanliness and freshness – perfect for skincare products. Warm golds and roses convey luxury and sophistication for premium makeup lines. Avoid colors that compete with your product’s natural hues or distort color perception.
Test your images on different devices to ensure color consistency. What looks perfect on your calibrated monitor might appear oversaturated on a mobile phone or washed out on an older laptop. Amazon’s mobile app accounts for over 70% of traffic, so mobile appearance takes priority.
Scale and Proportion Indicators
Cosmetics sizing confusion drives returns and negative reviews. Include scale references in at least two of your seven images to set accurate size expectations.
Show products next to common objects like coins, credit cards, or hands. A lipstick next to a quarter immediately communicates its size better than any written dimensions. For skincare products, show the bottle or jar in a hand to indicate whether it’s travel-size or full-size.
Use lifestyle context for scale without cluttering the image. A foundation bottle on a bathroom counter with a towel in the background provides scale reference while suggesting usage context.
Advanced Techniques for Professional Results
Focus Stacking for Maximum Sharpness
Cosmetics packaging often features intricate details, embossed text, or multi-level surfaces that challenge depth of field. Focus stacking combines multiple images shot at different focus points to create one perfectly sharp final image.
Take 5-8 shots of the same composition, adjusting focus slightly between each frame. Start with the closest product surface in sharp focus and gradually move the focus point deeper into the scene. Use a sturdy tripod and manual focus to maintain consistent framing.
Blend the images in Photoshop using the auto-blend layers function, or use specialized focus stacking software like Helicon Focus. This technique ensures every product detail remains sharp, from front label text to back panel ingredients.
Focus stacking becomes essential for angled shots showing multiple product faces. Traditional single-shot photography would require stopping down to f/16 or smaller, introducing diffraction that softens the entire image.
Reflection Control and Management
Reflective cosmetics packaging can make or break your photos. Uncontrolled reflections create hot spots that obscure text and product details. Strategic reflection management reveals product quality while maintaining visual appeal.
Use large diffusion panels positioned around your setup to control what reflects in glossy surfaces. White foam core or translucent shower curtains work effectively as budget diffusers. The reflection should show clean, even tone rather than identifiable light sources or studio equipment.
For glass or mirror compacts, consider what’s reflecting in the product surface. A clean white reflection suggests quality and cleanliness. Dark or cluttered reflections make products appear cheap or dirty.
Add subtle reflections intentionally to enhance product appeal. A controlled reflection of your main light source can add depth and dimension to flat packaging while maintaining the professional appearance Amazon buyers expect.
Color Accuracy and Calibration
Color accuracy matters more for cosmetics than any other Amazon category. Shade mismatches drive returns, negative reviews, and customer complaints. Your photography workflow must prioritize color fidelity over artistic interpretation.
Calibrate your monitor using a hardware calibrator like X-Rite ColorMunki. This ensures what you see during editing matches what customers see on their devices. Shoot in RAW format to maintain maximum color information for post-processing.
Include a color checker card in your setup shots (crop it out of final images). This reference allows precise color correction in post-production. Gray cards help set accurate white balance, while color checkers enable full color profile correction.
Test print key images to verify color accuracy in physical form. What appears correct on screen might shift significantly in print. While customers won’t print your photos, this testing reveals color profile issues that affect display across different devices.
| Lighting Setup | Best For | Key Angle | Diffusion Needed |
|---|---|---|---|
| 3-point setup | General products | 45° left/right | Softboxes |
| Backlighting | Liquid products | Behind product | Large diffusion panel |
| Single directional | Texture details | Low rake angle | Minimal |
| Overhead soft | Cream products | Directly above | Large softbox |
Post-Production Workflow for Amazon Standards
File Format and Size Optimization
Amazon’s image requirements demand specific technical standards that directly impact your listing’s performance. Main images must be at least 1000 pixels on the longest side, but uploading at 2000+ pixels enables zoom functionality that increases conversion rates by an average of 30%.
Save final images as high-quality JPEGs with RGB color mode. SRGB color profile ensures consistent display across devices. File sizes should stay under 10MB to prevent slow loading, but don’t compress so heavily that you introduce artifacts in gradient areas or product details.
Name files descriptively for internal organization: “Brand-ProductName-MainImage.jpg” rather than “IMG_001.jpg”. While Amazon generates its own file names, organized naming helps during upload and prevents errors when managing multiple ASINs.
For images showing multiple angles or configurations, maintain consistent cropping and white space. This creates a cohesive look when customers scroll through your image stack and suggests professional brand management.
Background Removal and Cleanup
Amazon’s main image requires pure white backgrounds (RGB 255, 255, 255), but achieving true white in-camera saves post-production time. When background replacement becomes necessary, use professional techniques that maintain realistic shadows and product edges.
Pen tool selection creates cleaner edges than automatic selection tools, especially around fine details like mascara wands or eyebrow pencils. Take time for accurate selections – sloppy cutouts look amateurish and hurt brand perception.
Maintain realistic drop shadows even on white backgrounds. Complete shadow removal makes products appear to float unnaturally. Subtle shadows ground the product and add dimensionality that improves perceived quality.
For lifestyle images, clean up distracting elements without over-processing. Remove dust spots, scratches, or background clutter, but maintain natural lighting and realistic textures that build customer trust.
Color Correction and Enhancement
Color correction for cosmetics requires surgical precision. The goal is accurate representation, not artistic interpretation. Start with white balance correction using gray card references shot during your session.
Adjust individual color channels to match physical product samples. Reds often need slight magenta adjustment to prevent orange shifts. Blues may require cyan tweaking to avoid purple casts. These subtle adjustments prevent the “doesn’t match the photo” reviews that kill cosmetics listings.
Enhance contrast and clarity without overdoing saturation. Overly vibrant photos set unrealistic expectations and increase return rates. Subtle contrast boosts improve perceived sharpness without crossing into oversaturation territory.
Apply sharpening as the final step using high-pass filtering or dedicated sharpening plugins. Amount depends on final output size – images displayed at smaller sizes need more aggressive sharpening to maintain detail visibility.
Amazon-Specific Image Strategy and Compliance
Main Image Requirements and Optimization
Your main image drives click-through rates from search results. Amazon’s guidelines require products to fill at least 85% of the frame against pure white backgrounds, but strategic composition within these constraints separates converting listings from abandoned ones.
Position products slightly above center using the rule of thirds. This placement feels natural to viewers and leaves space for Amazon’s mobile interface elements without covering critical product details. Amazon main image best practices emphasize this positioning for maximum visual impact.
Include only the primary product in main images – no accessories, lifestyle elements, or secondary items that distract from the core purchase decision. Save compelling accessories and usage scenarios for your additional six image slots.
Test main image variations using Amazon’s A/B testing tools or split-test different versions across similar ASINs. A 2% CTR improvement from main image optimization can reduce ACoS by 15-20% while increasing organic ranking momentum.
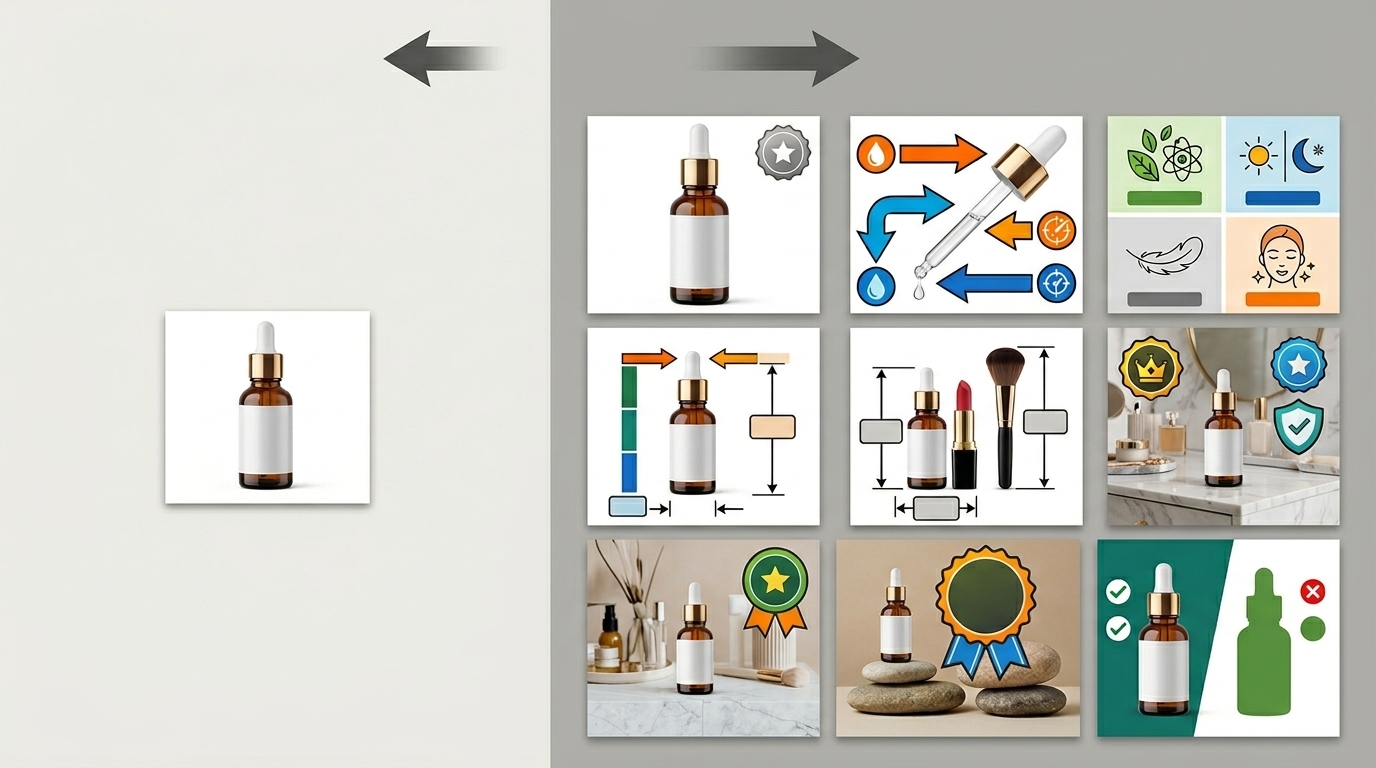
Maximizing Your Seven Image Slots
Strategic use of all seven available image slots increases conversion rates significantly compared to listings with 3-4 images. Each slot should serve a specific purpose in your conversion funnel, answering different customer questions and objections.
Follow this proven sequence: main product shot, product in packaging, detail/texture closeup, size comparison, usage demonstration, ingredient/feature callouts, and lifestyle context. This progression mirrors the customer’s mental buying process from initial interest to purchase confirmation.
Research shows that listings with seven optimized images convert 40% higher than those with fewer images, even when controlling for product quality and price. The additional images provide confidence and reduce purchase anxiety that kills conversions.
Avoid duplicate angles or redundant information across slots. Every image should add unique value. If you can’t clearly articulate why each image belongs in your set, customers won’t understand its value either.
Compliance and Policy Considerations
Amazon’s image policies for cosmetics include specific restrictions beyond general requirements. Health claims, before/after comparisons, and medical terminology can trigger listing suppression or account warnings.
Avoid text overlays making cosmetic claims like “anti-aging,” “reduces wrinkles,” or “clinically proven” unless your product has FDA approval for these claims. Stick to descriptive text about application, ingredients, or usage instructions that don’t imply medical benefits.
Lifestyle images showing product application must avoid suggestive positioning or overly glamorous styling that implies enhanced attractiveness beyond normal cosmetic use. Amazon lifestyle images that convert focus on natural application and realistic results rather than aspirational imagery.
Models in lifestyle shots must appear professional and appropriate for your target demographic. Avoid extreme close-ups of lips or eyes that could be flagged as inappropriate content. Natural lighting and minimal retouching maintain compliance while building customer trust.
| Image Slot | Purpose | Key Elements | Conversion Impact |
|---|---|---|---|
| Slot 1 (Main) | Drive CTR from search | Product only, white background, 85% frame fill | Primary CTR driver |
| Slot 2 | Show packaging/unboxing | Product with original packaging | Builds legitimacy |
| Slot 3 | Reveal texture/quality | Extreme closeup of product details | Quality confirmation |
| Slot 4 | Indicate size | Size comparison with common objects | Sets expectations |
| Slot 5 | Demonstrate usage | Application or usage context | Reduces confusion |
| Slot 6 | Highlight features | Ingredient callouts, feature benefits | Differentiates from competitors |
| Slot 7 | Lifestyle context | Natural usage environment | Emotional connection |
Follow Amazon’s evolving image requirements as policies update frequently. Subscribe to seller notifications and review policy updates quarterly to avoid compliance issues that could impact your listing visibility or account health.
Related Articles
- DIY Amazon Product Photography Setup: Build a $200 Studio That Gets Results
- Product Photography Lighting for Amazon: Step-by-Step Setup Guide for Professional Results
- Amazon Product Photography Pricing Breakdown: What Actually Drives ROI in 2024
Frequently Asked Questions
What camera settings work best for cosmetics product photography on Amazon?
Shoot in manual mode at f/8-f/11 for optimal sharpness across the entire product. Use ISO 100-200 to minimize noise and maintain clean images. Shutter speed depends on your lighting setup but typically ranges from 1/60 to 1/125 second with continuous LED lighting. Always shoot in RAW format to preserve maximum color information for post-processing.
How do I prevent reflections on metallic cosmetics packaging?
Use large diffusion panels positioned around your subject to control what reflects in glossy surfaces. Position white foam core or translucent materials at 45-degree angles to create clean, even reflections instead of harsh light sources. Polarizing filters on your lens help reduce unwanted glare while maintaining the metallic appearance that suggests quality packaging.
What background colors work best for cosmetics lifestyle images?
Choose backgrounds that complement rather than compete with your product packaging colors. Neutral tones like soft grays, warm whites, or natural wood work universally well. Cool blues and greens suggest cleanliness for skincare, while warm tones like blush or gold convey luxury for premium makeup lines. Avoid bright colors that distort perception of your product’s true colors.
How many images should I use for a cosmetics listing on Amazon?
Use all seven available image slots for maximum conversion impact. Research shows listings with seven optimized images convert 40% higher than those with fewer images. Each slot should serve a specific purpose: main product shot, packaging context, detail closeup, size comparison, usage demonstration, feature highlights, and lifestyle application. Every image should answer different customer questions and reduce purchase anxiety.
What’s the most important factor for cosmetics color accuracy in photos?
Proper white balance and color calibration throughout your workflow matters most for accurate cosmetics photography. Shoot under daylight-balanced LED lighting (5000-5500K), calibrate your monitor with hardware calibration tools, and include color checker cards in your setup shots for precise post-processing correction. Color mismatches drive returns and negative reviews more than any other factor in cosmetics listings.
Leave a Reply